Securing your Firebase Database
Overview
In this guide, you will learn how to secure your Firebase real-time database using Firebase Rules. Rules are a JSON and JavaScript based system that allow you to restrict database access to certain tags and/or users.
You will be making a simple app that lets users sign in with Firebase Authentication and saves their data in the real-time database. Then, you will write some rules to prevent others from accessing sensitive user data.
Pre-requisites
Here are some things you should know before you can get started with this guide.
- Working with Firebase Database and Authentication
- Working with Firebase Rules
Caution
This is guide covers advanced Firebase topics. For sake of keeping this guide at a readable length, some basic instructions will be glossed over with the assumption that you are aware of the workings of other components. If not, please take a look at more basic guides before getting started here.
Take a look at our guide on working with Firebase Rules for an introduction to the rules system.
First steps
Head over to your Firebase Console to set up a real-time database for your Firebase project. If you do not have an existing project, create a new one.
Use the navigation menu on the left to go to the Database section.
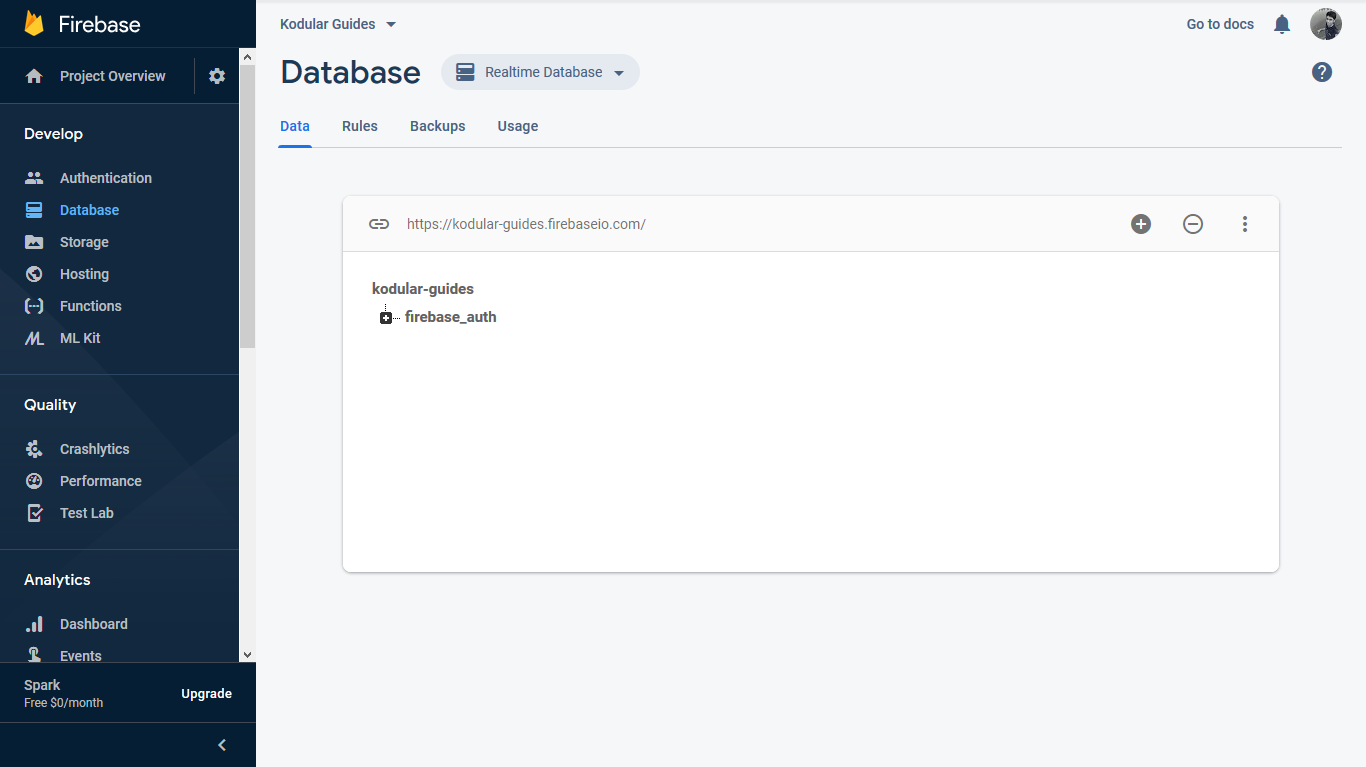
In case the real-time database has not been enabled already, scroll to the bottom and click on "Realtime database".
You will be using Google login for user authentication. Go to the Authentication section using the menu on the left, and enable Google as an authentication provider. More details on Google authentication can be found here.
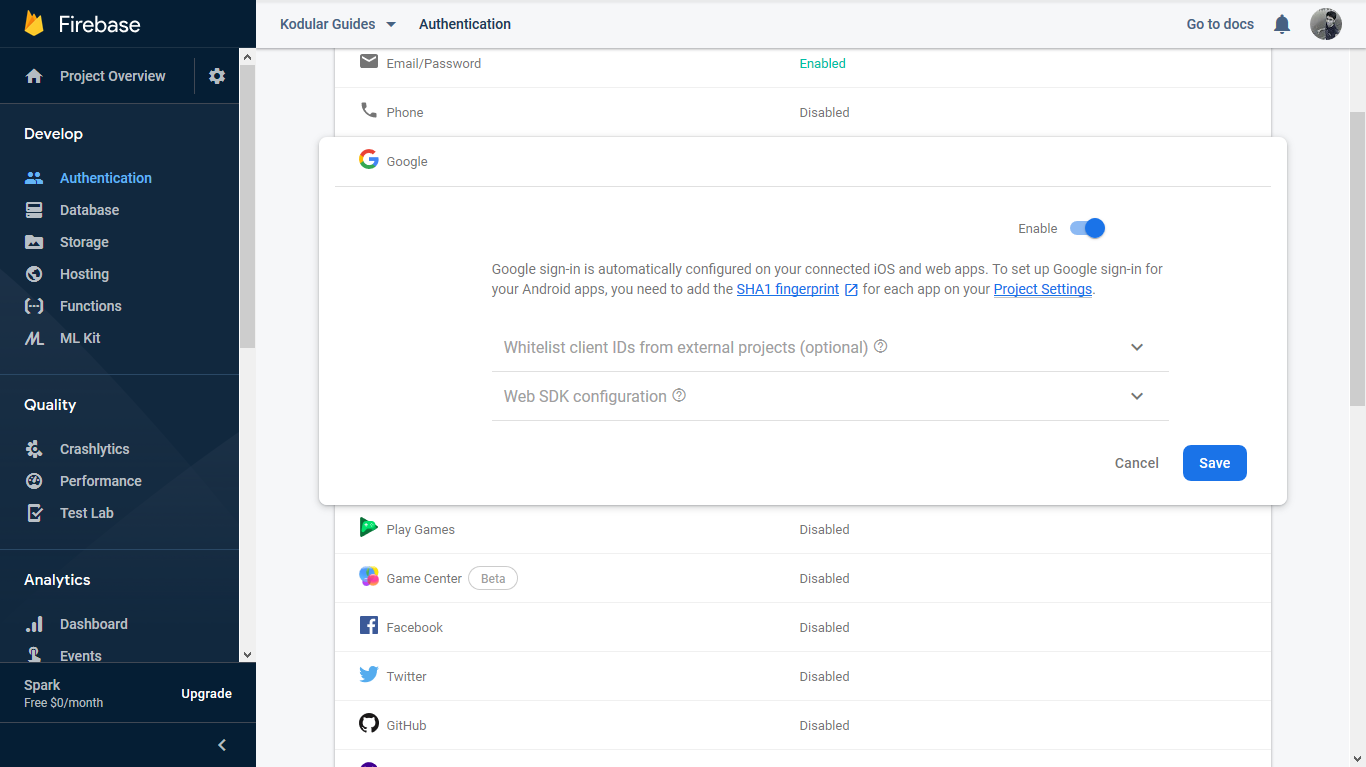
Enable Google login
Database structure
For this tutorial, we will store a tag for each user who signs-up in the app. The tag will be identified by the user's unique id, and will contain their name, email, and the Android version of their device. We wish to keep the users' names public, but their email and Android version private.
Here is what our database will look like:
- bucket_name
    - uid
        - name
        - email
        - android_version
    - uids
uids will be an array of all unique ids that are in the database. We will use this tag later to iterate through all users and get their names.
That's all the Firebase for now. Let's move to building your app. We'll come back to the Firebase console later to write the rules.
Designing the app
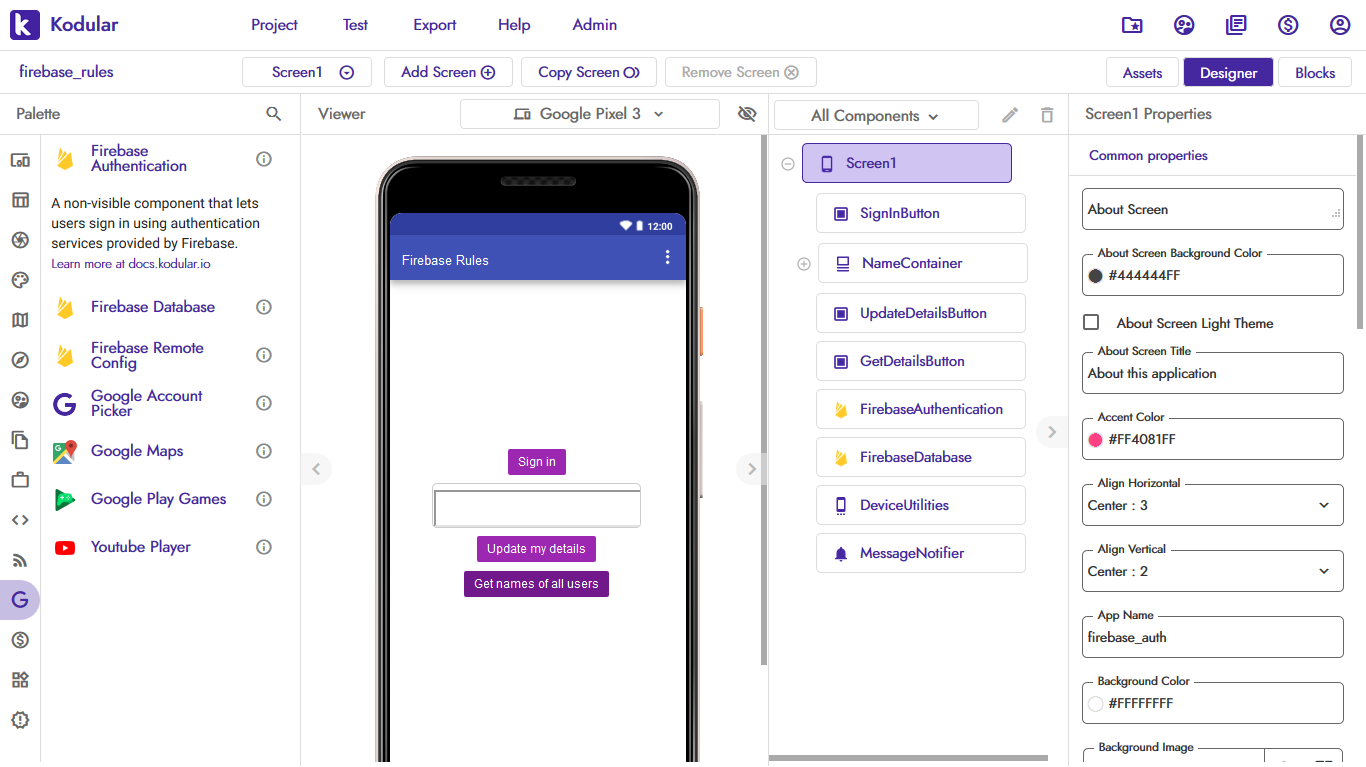
As usual, we'll start with a new project. We will need three buttons for this project - one to sign the user in, another to send their details to the database, and one more to fetch the names of all users in the database. Drag and drop three Button components and name them SignInButton, UpdateDetailsButton, and GetDetailsButton.
Next, drop a Text Box where the user will be able to enter their name.
Then, add a Notifier component and rename it to MessageNotifier. We will use this component to display the names of all users.
Finally, drop the Firebase Database, Firebase Authentication, and Device Utilities components. The Device Utilities component will be used to fetch the Android version of the user's device.
Warning
You will have to upload the google-services.json file to Assets to be able to export your app. This file can be obtained from your Firebase Console.
This is what your designer should look like
Tip
The components shown above have been styled with colors and borders to make them look better. Download AIA from the bottom of the page to use them in your app!
Coding the blocks
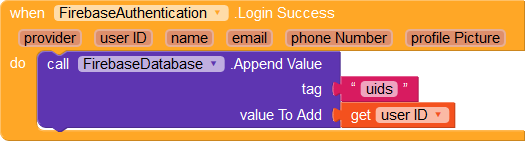
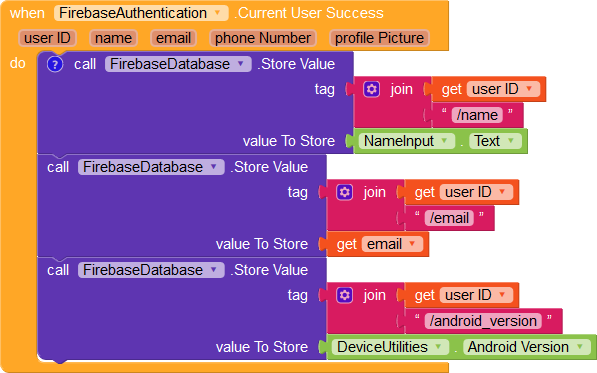
First, we add an event block to handle clicks on the SignInButton. The user is to be shown a prompt to sign in with Google.

Once the login is successful, we append the user's unique id to the uids tag in the database.
Next, we handle clicks on the UpdateDetailsButton. When the button is clicked, we first fetch the user's details so that we can get their uid. Then, using the uid, we update their name, email, and Android version.

Note
As of now, a user can fetch the list of all uids and update the details of any other user. We will be writing Firebase rules later to ensure the data a user can edit is limited to their uid.
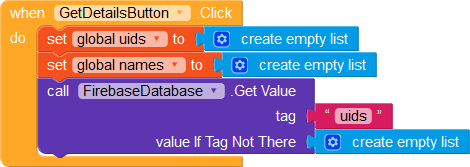
Finally, we code the recursive function to get the names of all the users. Note that we cannot use the Get Tag List block as the rules we will be writing will block direct access to these tags.
To get the names of all the users, we will need two lists: one for all uids and another for all names.


We initiate the recursion using the Click event block for the GetDetailsButton.
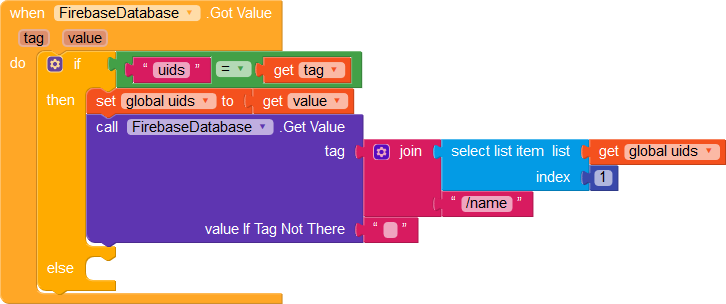
When the value has been fetched, we populate the list of uids, and then fetch the name of the first uid in the list.
We do the same for each uid in the list. Every time we fetch the name of the uid, we remove the uid from the list and add the name to the names list.
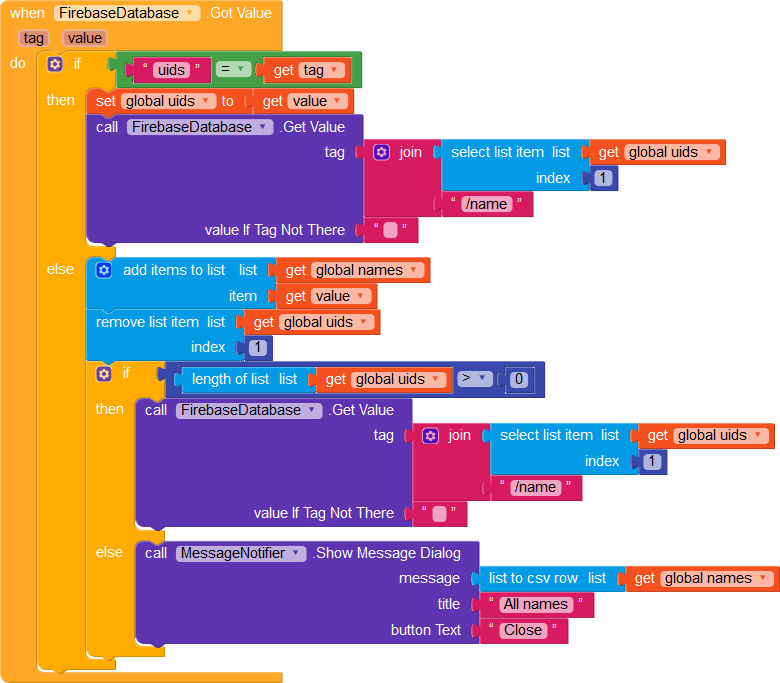
Once all names have been fetched, we show them in a message dialog.
Writing the rules
Head back to your Firebase console. In the Realtime Database section, navigate to the "rules" tab.
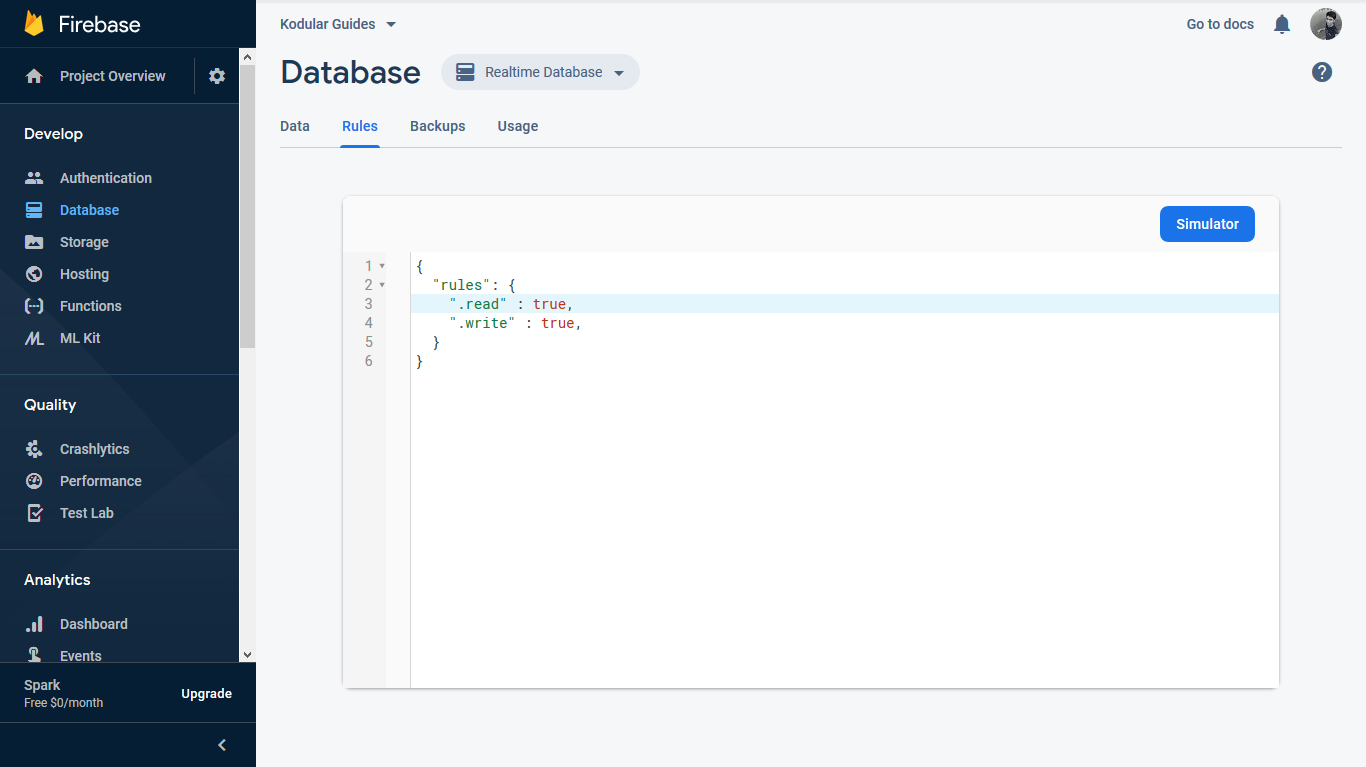
By default, Firebase allows full read/write access. If you created your database in locked mode, the default rules will allow only authenticated users, and your rules will look something like:
{
  "rules": {
    ".read" : "auth != null",
    ".write" : "auth != null",
  }
}
Neither of them are secure because all your users have access to all data in your database. Let's fix this with a few rules.
To start off, replace the currently set rules with a blank template as shown below:
{
  "rules": {

  }
}
Next, change the rules as shown to target all tags in your project bucket. Replace *PROJECT_BUCKET* with your bucket name. (The bucket name can be found in the designer properties of the Firebase Database component).
{
    "rules": {
        "*PROJECT_BUCKET*": {
            //... to be added later
        }
    }
}
Rules for users' details
We wish for a user to be able to edit only their details. Each user has a tag for themselves, which is named as their uid. Thus, a user should only be able to edit the tag which belongs to them. We can use wildcard keys to select any tag inside your project bucket, as shown below:
{
  "rules": {
     "*PROJECT_BUCKET*": {
      "$uid": {

      }
    }
  }
}
A user should be able to edit only their name and nobody else's, but all authenticated users should be able to view every user's name. We can restrict read/write operations accordingly with this rule:
"name": {
    ".read": "auth != null",
    ".write": "auth.uid == $uid"
}
However, the email and Android version should have restricted read and write access.
"email": {
    ".read": "auth.uid == $uid",
    ".write": "auth.uid == $uid"
},
"android_version": {
    ".read": "auth.uid == $uid",
    ".write": "auth.uid == $uid"
}
Our list of rules currently looks like this:
{
  "rules": {
     "*PROJECT_BUCKET*": {
      "$uid": {
        "name": {
            ".read": "auth != null",
            ".write": "auth.uid == $uid"
        },
        "email": {
            ".read": "auth.uid == $uid",
            ".write": "auth.uid == $uid"
        },
        "android_version": {
            ".read": "auth.uid == $uid",
            ".write": "auth.uid == $uid"
        }
      }
    }
  }
}
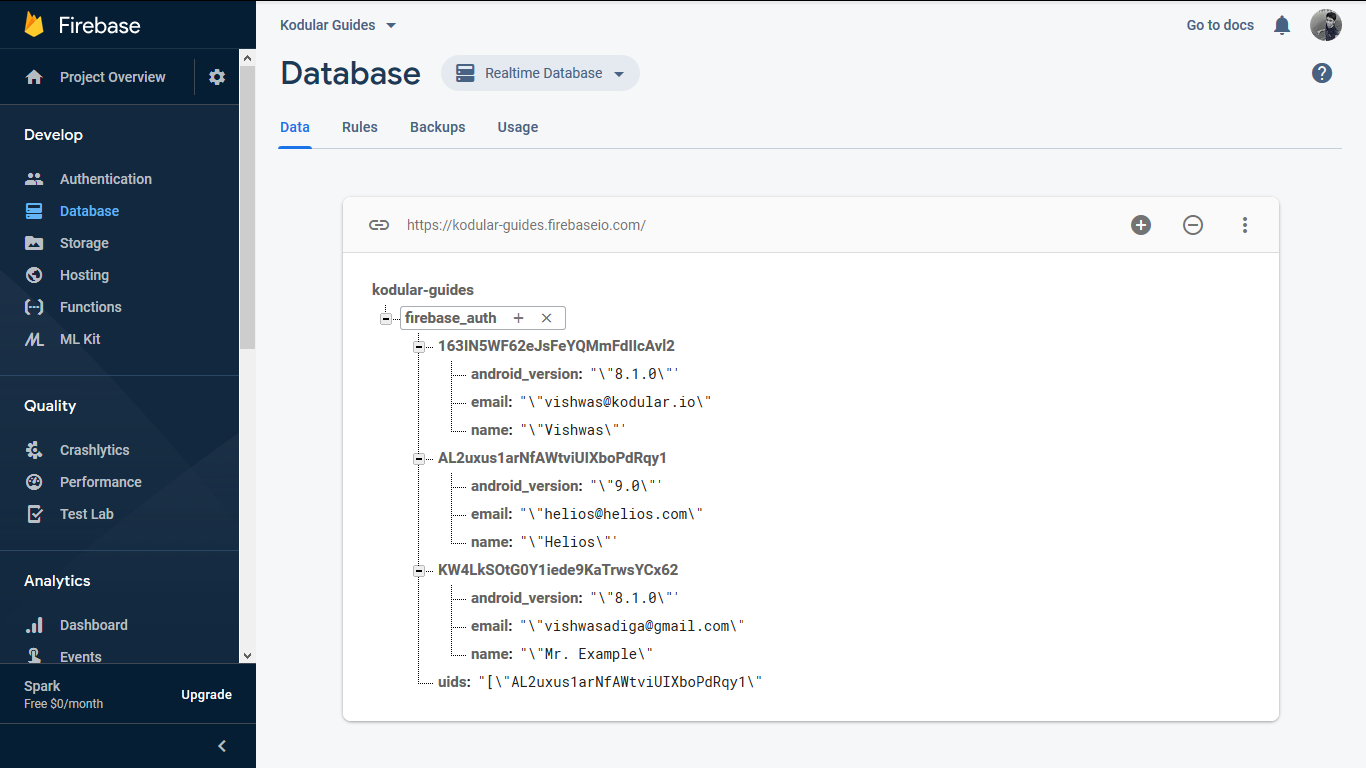
Let's take an example of a sample database to see how the rules work. The database currently has the following data:
{
  "*PROJECT_BUCKET*" : {
    "163IN5WF62eJsFeYQMmFdIIcAvl2" : {
      "android_version" : "\"8.1.0\"",
      "email" : "\"vishwas@kodular.io\"",
      "name" : "\"Vishwas\""
    },
    "AL2uxus1arNfAWtviUIXboPdRqy1" : {
      "android_version" : "\"9.0\"",
      "email" : "\"helios@helios.com\"",
      "name" : "\"Helios\""
    },
    "KW4LkSOtG0Y1iede9KaTrwsYCx62" : {
      "android_version" : "\"8.1.0\"",
      "email" : "\"vishwasadiga@gmail.com\"",
      "name" : "\"Mr. Example\""
    },
    "uids" : "[\"AL2uxus1arNfAWtviUIXboPdRqy1\", \"163IN5WF62eJsFeYQMmFdIIcAvl2\", \"KW4LkSOtG0Y1iede9KaTrwsYCx62\"]"
  }
}
A user currently authenticated with the uid AL2uxus1arNfAWtviUIXboPdRqy1 is able to fetch their own name, email, and Android version:


The user is also able to edit the value of their name, email, and Android version.


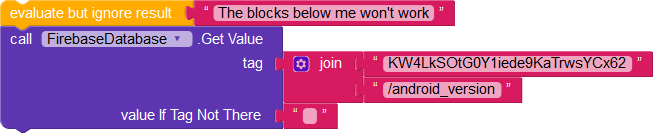
In addition, the user can access the names of other users, say, one with the uid KW4LkSOtG0Y1iede9KaTrwsYCx62.

But they cannot get the email or Android version of other users.
Nor can they set the name, email, or Android version of other users.
Rules for list of uids
Every user should be able to access the list of all uids, but should not be allowed to spam the list with random values. We can validate the data to ensure the user is appending their uid to the list, and not any other value.
Validation can be done using the following rule:
"uids" : {
    ".read" : "auth != null",
    ".write" : "newData.child(auth.uid).exists()"
}
With the rule set, all authenticated users will be able to read the value of the uids list. An authenticated user can also append their uid to the list. However, no other value except the user's uid can be entered. In essence, the newData variable must have a child that is the user's uid, which guarantees that the appended list has the correct uid.
The current implementation, however, adds the user's unique id to the list every time they login. To keep only unique values of the uid, we prevent users from writing duplicates.
The .write rule can be changed from ".write" : "newData.child(auth.uid).exists()" to ".write" : "newData.child(auth.uid).exists() && !data.child(auth.uid).exists()"
This ensures that the uid is written only if the current data doesn't already contain it.
Let's illustrate with the example of a user with the uid AL2uxus1arNfAWtviUIXboPdRqy1.
The user can append their uid to the list of all uids

But cannot append anything other than their uid

Our final list of rules looks like this:
{
  "rules": {
     "firebase_auth": {
      "$uid": {
        "name": {
            ".read": "auth != null",
            ".write": "auth.uid == $uid"
        },
        "email": {
            ".read": "auth.uid == $uid",
            ".write": "auth.uid == $uid"
        },
        "android_version": {
            ".read": "auth.uid == $uid",
            ".write": "auth.uid == $uid"
        }
      },

      "uids" : {
        ".read" : "auth != null",
        ".write" : "newData.child(auth.uid).exists() && !data.child(auth.uid).exists()"
      }
    }
  }
}
Conclusion
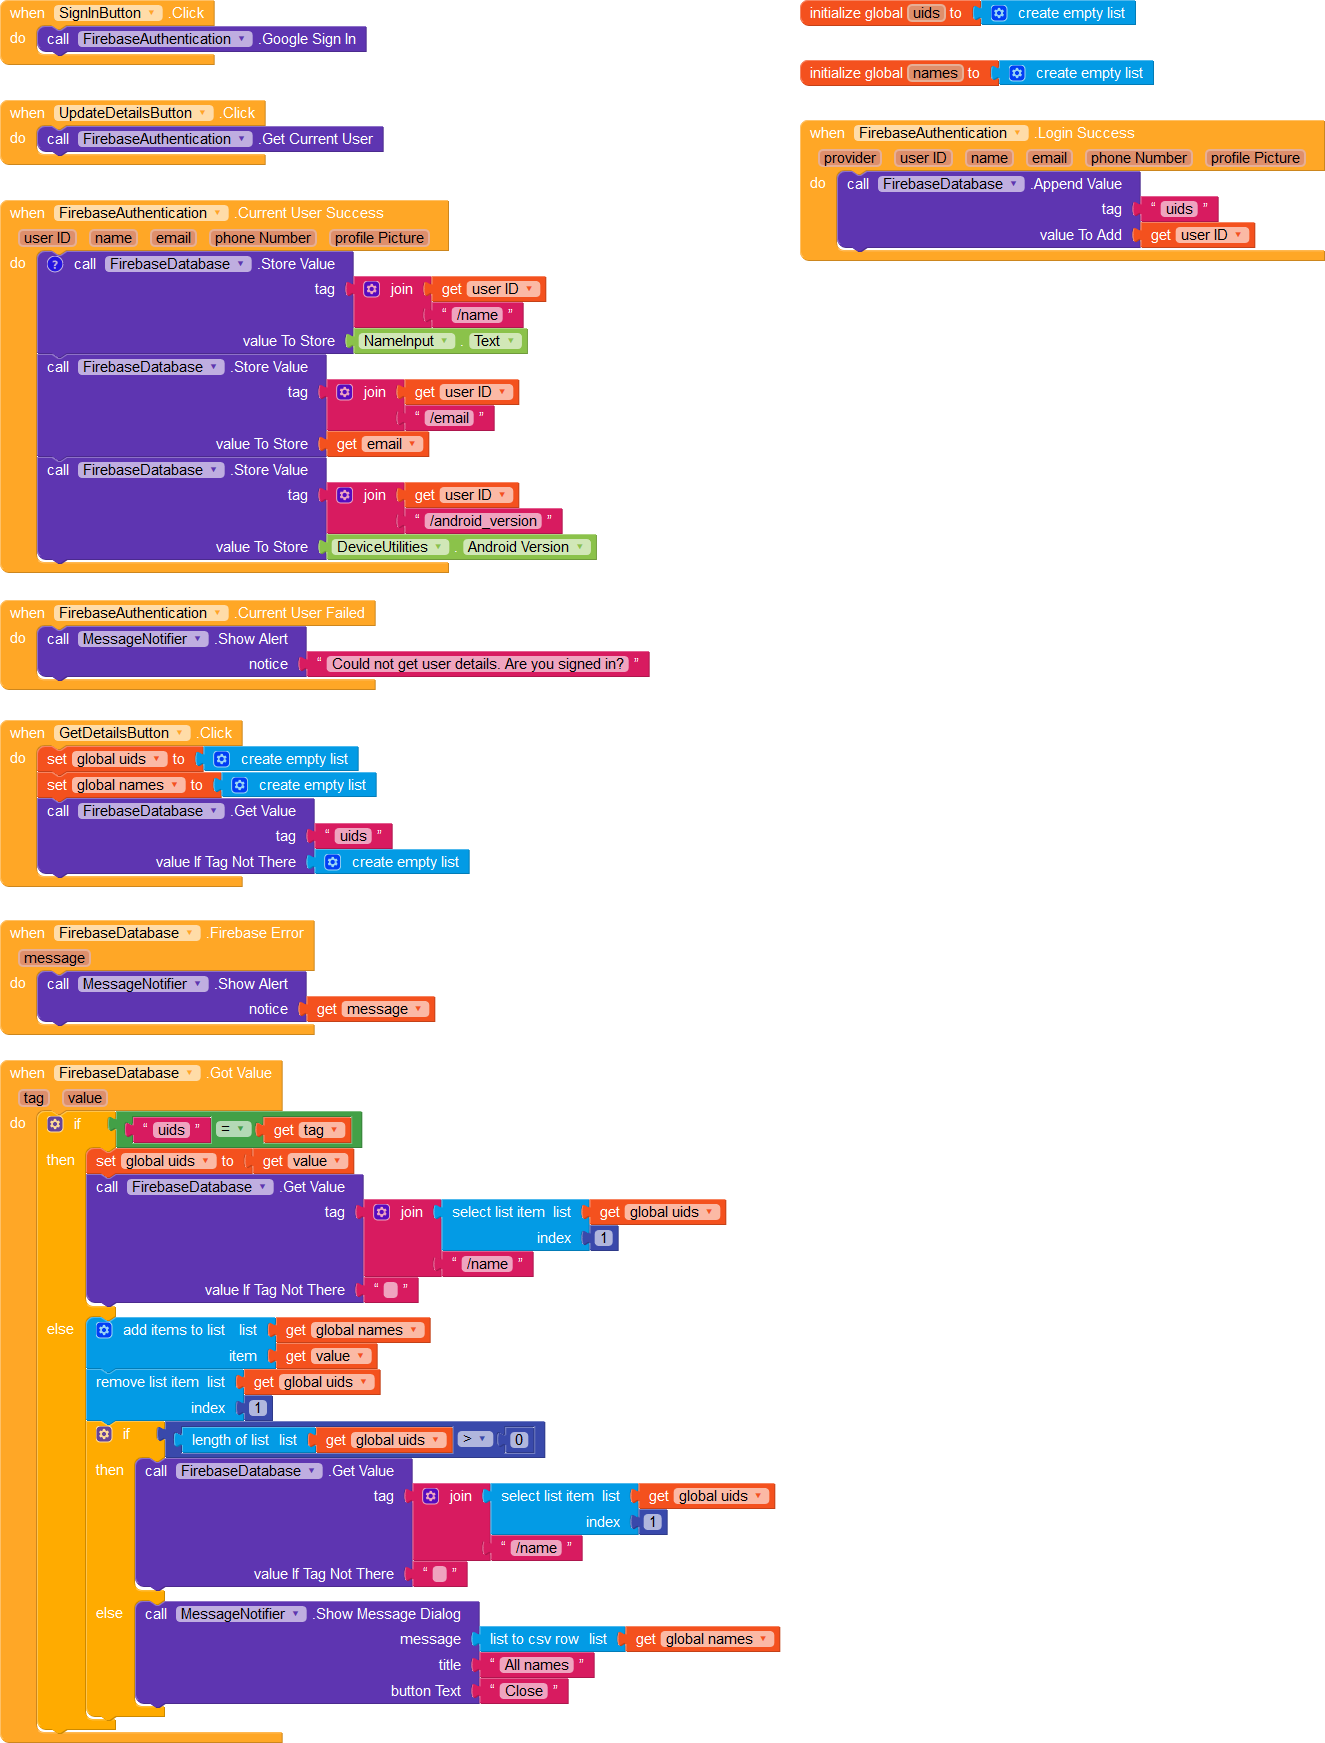
All the blocks we've used in this guide
Congratulations! You've successfully secured your Firebase database from malicious users!
Here is a summary of what you've learned in this guide.
- How to set up a Google login system using Firebase Authentication.
- How to write rules that allow only partial access to tags and values.
- How to recursively fetch details of all users.
Next steps
Want ideas for making this app better? We have some things for you to try.
- Add more tags for each user and decide if they should be public or private.
- Ensure that the name, email, and Android version are never empty using Firebase validation rules.
- Let users sign up/log in using their email and password
Downloads
Get the AIA file here.